Sunday, December 30, 2012

Primrose Petals Bag


Heres a bag that I made at Julie Kettlewells class a couple of months ago.

The cards fit inside the bag

The bag is made using Natural Composition Speciality DSP (very heavy paper - almost card)  The pink is primrose Petal and the yellow is Summer Starfruits.  The band and top of the bag were cut using Adorning Accents Edgelits and paper for the band was from the Designer Series Paper Stack.
The large butterfly was cut using Elegant Butterfly punch and the Papillon Potpourri stamp set.  The small butterflies are from Beautiful Wings embosslits.
The banners are stamped with Itty Bitty Banner stamp with Soft Suede Ink on Very Vanilla card.  The butterflies on the banner have a small facetted vintage button.  The flower on the bag is made using Blossom punch and has large facetted vintage button in the centre
The envelopes are made using Crumb Cake card, decorated with Soft Suede ink and Just Believe stamp set


Ive made another bag using Rich Razzleberry and Floral District DSP
The band and top of the bag are cut using Adorning Accents Edgelits
The handles were made using Dotted Scallop border punch
The button in the centre of the flower is from Naturals Designer buttons
Ribbon is Daffodil Delight Seam Binding ribbon

Sunday, December 16, 2012


Ive finally managed to get photos of a folding card that  I taught my mother in law to make.  We chose the colours to make a Christmas version of the card.  
Excuse the picture quality, they were snapped with my phone .


And heres the box


I'll add the card I made with Katherine later

Sunday, November 18, 2012

Lovely As A Tree

Here are two versions of the same card that I did at Kates class this Saturday.

I've wanted to do a reflection card for ages and finally got round to it.


Stamp is Lovely as a Tree.  Inks are Black Stazon, Night of Navy and Lucky Limeade.  I made the grass darker on the left hand card by adding Crumb Cake ink.  The right hand card has a little Dazzling Diamonds glitter on the moon, trees and water to highlight the areas that would be lit by the moon.

Papaya Collage


Heres my version of the Papaya Collage card that I made this week with Chris, Kate and Anita.

We used French Foliage and Papaya Collage stamps with Pink Pirouette, Soft Suede, Chocolate Chip and Crumb Cake inks .

The colours look a bit washed out with the poor lighting conditions today

Wednesday, November 7, 2012

Shoe Birthday Card


 Here's a birthday card that I've recently done. Its the first time I've used this new shoe stamp and paper which I love (I have a thing about shoes on cards).  The shoe is from a set called fabulous you. The background was from Summer Smooches DSP.   The greeting is from the petite pairs stamp set, stamped in Island Indigo, cut out using the extra large oval punch.    The 3 mats and layers are cut using Labels Collection framelits, pricked with the matching pricking template.  The ribbon is Ruffled Ribbon in Island Indigo.  The edges of the white greeting and mat were daubed using Island Indigo ink to take away a bit of the starkness.


The yellow flowers are punched with Boho Blossoms punch.  The inner flower is punched using Itty Bitty punch.  Card is Daffodil Delight.  The centres are basic pearls.  The leaves are punched from Little Leaves Sizzlits die on Lucky Limeade card.


The shoe was 'blinged up' with rhinestones.  The blue flower was made using Itty Bitty punch with a rhinestone centre.


Wednesday, October 24, 2012

Nature Walk

I've not posted for a while as decorating has got in the way.

Heres a Birthday card I've recently made.

The background is plain white card, brayered with Soft Suede and Pool Party Ink.  This was my first attempt with the brayer and I intended to blend the colours more but liked this effect so left it like this.

The background stamp is En Francais stamped in Soft Suede.  I stamped the Birdcage with the bee in Soft  Suede on Crumb Cake paper.  The Crumb Cake strip on the lace was embossed using Square Lattice embossing folder and daubed with Soft Suede ink.  The button is from the Naturals Designer Buttons collection.  I then did a rough running stitch through the strip and the button with Bakers Twine.  The lace was from my stash.


The tag is Pool Part paper, cut using Two Tags die.  The tag is stamped with Soft Suede ink and the stamp is from French Foliage.
The strip at the bottom of the tag is Crumb Cake paper cut with Scallopped Dotted Ribbon punch.
The bird is from Nature Walk stamps using Soft Suede card stamped with Early Espresso.  The oval that the bird is sat on is Very Vanilla card, run through the Designer Frames oval embossing folder.
The leaves are Crumb Cake card cut using Little Leaves sizzlits die.  The flowers are Pool Party card, cut using Itty Bitty shapes punch and daubed with Pool Party ink.  They have a Basic Pearl in the centre.
The ribbon is Early Espresso.

Sorry about the long post.  I dont think I could've added much more to this card !

Sunday, October 7, 2012

Birthday Card


Heres a card that I made for my friend Kates birthday.

The paper is attic boutique (retired), leaves are in soft suede and cut with a little leaves die.

The ribbon was made using baja breeze ink and and card and the stamp and friend embellishment are from the affection collection

The flower is made using build a blossom punch and attic boutique paper.  The small blue centre is made using baja breeze paper and boho blossoms punch..  The washer is one that Kate gave me.  

Happy Birthday is stamped and punched using Word Window. 


Tuesday, October 2, 2012

Wedding Card


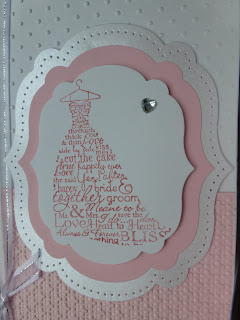
Heres a wedding card that I have recently made.  Again, apologies for the paper clip which is holding the card shut.  I used Pink Pirouette card.  The stamp is the dress from Love and Laughter, stamped in Pink Pirouette.  Inside is a matching verse from the Love and Laughter stamp set.

I used my new window frames framelits for the matting around the dress.  I used the matching paper piercing template for detail which you can see in the second pic.

The white card was textured with Perfect Polka Dots embossing folder and the pink textured with Square Lattice embossing folder.

The sentiment is from Teeny Tiny Sentiments, cut out using Word Window and matted on Modern Label punch.

The pink edge was made using Dotted Scallop Ribbon border punch.  The two hearts were taken from my stash.


The Envelope was decorated with a new stamp set called Affection Collection, again using Pink Pirouette ink


Saturday, September 29, 2012

Getting to grips with Blogger

I've had a few mails recently advising that they were unable to post comments on my blog as word verification was switched on.

Being new to this blogging stuff I had no idea that this was switched on or could be switched off.

I have (hopefully) now turned off word verification

I'll be adding a few more of my cards soon

Cheryl x

Sunday, September 16, 2012

Holiday Ornament Project


As soon as I saw this on the front of the Autumn/Winter catalogue I had to make it.

Thanks to Kate for showing me how to put the project together.

I used the holiday ornament stamps and framelits with lucky limeade and cherry cobbler ink.

The ribbon is cherry cobbler tulle ribbon.

The project is time consuming but the end result is well worth the effort


Holiday Ornaments Swap


Here are four of my latest swaps.  I've used a white card sprayed with diluted frost white and platinum shimmer paint.  The ornaments are stamped with lucky limeade and cherry cobbler and cut out with the matching holiday ornaments framelits, topped with a cherry cobbler ribbon bow.

The patterned papers are from festival of prints.  I used 4 different papers along the same theme.  The red trim is cherry cobbler card, cut using scallop trim border punch (one that I use a lot !)

The sentiment is cherry cobbler cobbler ink, stamped with Teeny Tiny Sentiments and cut out with the word window punch.  The cherry cobbler mat was cut using the modern label punch.   


Friday, August 31, 2012

Order Placed !

Ive spent this morning placing the first of many orders from the new Stampin' Up! catalogue.  Today is the first day of the Autumn / Winter catalogue.
I'm hoping that the order is waiting for me when I get back from holiday.

Cant wait !

Sunday, August 26, 2012

The Box

Last Saturday I went to a class held by Sara, Jan and Hazel. One of the projects was to make an envelope box using the simply scored board. I've avoided making envelopes for the last twelve years but the board makes it so easy. Thanks ladies!

Start with a 12 x 12 sheet of card on the diagonal board. Score at 4 1/2 and 6 inches as shown below. 


Turn the card by 90 degrees and score again. Repeat until all four sides are scored. It should look like this.


I've shaded the areas that need to be cut and removed. I've highlighted in pink where you need to cut along two of the lines.


It should now look like this.


I've written on the picture below but its a bit small to see so I will try to explain. The pointed bit at the top is going to be the top flap of your envelope box. The pointed bit at the bottom is going to be the bottom flap. I have marked two of the sides at the top edge with cross hatchings. This is to remove a 1/4 of an inch so the back of the box is a bit lower. You may wish to trim a bit more off but try taking this amount off first.


Crease along all the scored lines with a bone folder. You are now ready to start folding the box. Bring the side flaps in and fold the tabs in, as shown below.


Now fold the bottom flap up. I prefer to stick using wet glue so you have chance to get it all straight. Sorry about the print on the card but I've used the backing card from a pack of designer paper. Your box is now ready to decorate.

I hope the instructions are easy to follow. Please leave me feedback and let me know if I have made any mistakes. Its also nice to know I'm not talking to myself too - lol


Folding Card

A few weeks ago my crafting friends Chris and Kate took me to a SU class run by Julie Kettlewell. Julie credited the design to Chris Chamberlain. Thanks ladies!

I made another version and took this along to our team meeting. I had a lot of requests to show how it was made. First, here's the box and the card.  I will show you how to make the flower later on.


To make the card I am using the Simply scored board and scoring tool. Take a 12 x 12 inch (30cm) paper and mark both sides 3 inches in from the edge.


Turn it through 90 degrees and score again so you have scored all four sides 3 inches from the edge.


Put the diagonal scoring plate on the simply scored board. Score diagonally from centre to centre of each side as shown below. 

When you have finished it should look like this.


Now score a diagonal line on each of the four corner squares as shown below.


When you have scored all four outer squares it should look like this.


Fold along each scored line backwards and forwards using a bone folder. You should now be able to fold your card to look like this.


To decorate the inside cut two 10 x 10 cm squares diagonally. Cut eight 7 x 7 cm squares diagonally. I have used contrasting papers from the same designer paper series. Decorate the centre panel as desired.

Turn the card over to decorate the reverse. Cut two 10 x 10 cm squares.

To make the belly band cut a piece of card 30.5 cm x 4 cm. Decorate and adhere a 20cm length of ribbon to each end.

I will put instruction on how to make the box later.


Friday, August 17, 2012

Another Tri Shutter Card

I seem to be addicted to making these cards

Flower is from build a blossom and paper is attic boutique

Butterflies are from the butterfly embosslet die


Tuesday, July 31, 2012

Build a Blossom

Heres a card that I sent to my crafting friend Chris.  The flower and leaves are made using Build a Blossom punch.  Scallop punch was used to make the lace edging.  Papers are beau chateau, soft suede and and pink pirouette 

Gatefold Anniversary

Ive used the same papers on this card as the previous post (everyday enchantment) and the same stamp set (love & laughter)

Excuse the paper clip - this was to keep the card flat


The flower and label is made using Everything Eleanor. The leaves and frames are die cuts.

Anniversary Card

I decided to try doing something a bit different for a change. I'm quite fond of vintage style so I thought I would make this a little brighter and not quite as aged or distressed.


Sunday, July 29, 2012

Another of the Wedding Cards

I tried to make the wedding cards different.  On this one I used a mulberry die cut bride and groom and a diorama card.

Tri Fold Wedding Card


This is another card from the four that I am doing for a wedding.  Paper and ink are pink pirouette, stamp set is called Love & Laughter and the white edge is made using the lace punch.  Labels are framelits dies.  I've added a few photos to show each side of the card


Wednesday, July 25, 2012

Stamped Wedding Diorama Card.

Here is another one of the wedding cards. I decided to use my new stamp set called Love & Laughter and Baja Breeze ink.


You can see the inside of the card better when its stood up. I hadn't yet stuck the front greeting on in the second photo below.


Its impossible to write on these cards once they are made so I have made a panel to be written on and stuck on the back of the card with double sided tape.


What do you think?